Introduction
Many processes in operational environments are divided into stages, and checks often need to be made at each of these stages. We often see checklists relating to the start of a day, the start of a production process, the opening of a building or area. These may then be followed by regular repeated checks for a period of time, followed by a final set of checks when the process ends or the building closes.
A ‘process’ in ChecQR lets you arrange standard your ChecQR checklists into a process flow to deliver several benefits:
- ChecQR can guide the user though the process correctly if it knows what order the stages processes should be carried out in. For example can make sure closing checks can only done after opening checks.
- Where regular checks are required on a schedule; e.g. every hour, ChecQR can repeat that checklist according to the schedule for as long as necessary
- Rather than having QR codes for each checklist in the process a single QR code can be created for the whole process
- Results for all the checks in the process can be presented onto a single report document.
Processes are defined in the ChecQR dashboard and can be as simple or as complex as required. Reports are built in a modular way with a template for each checklist and a template for the whole report where they can be defined.
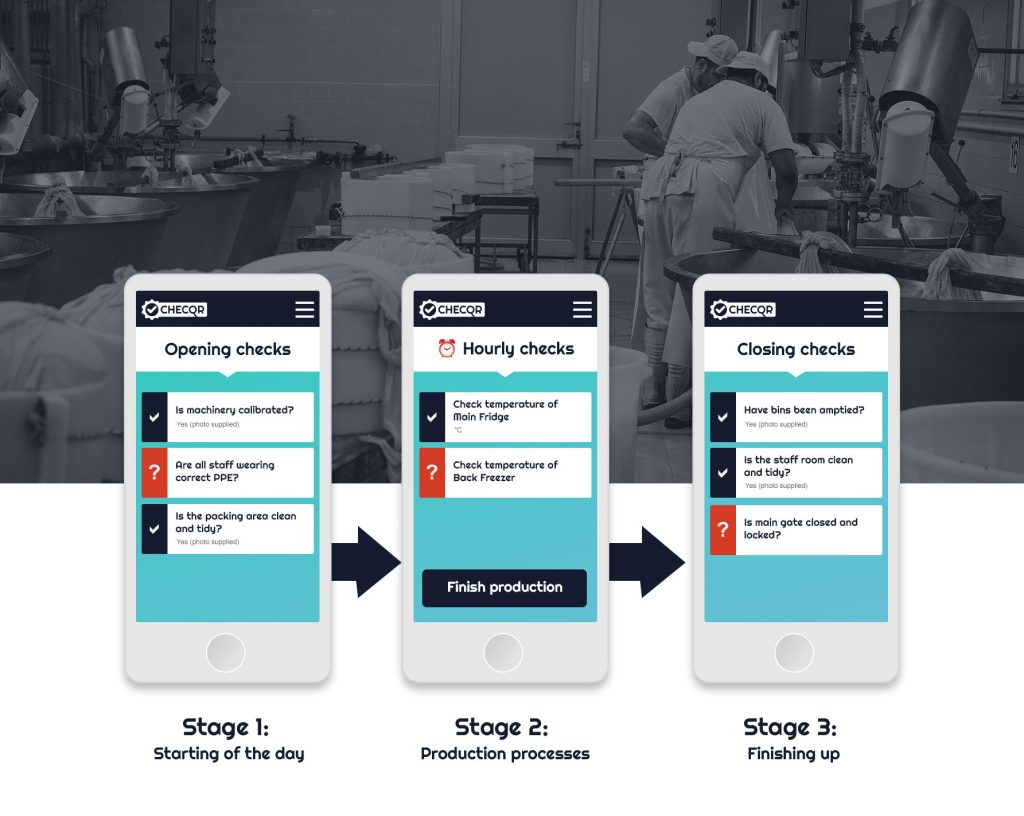
Example: The East Warehouse – open / hourly / close

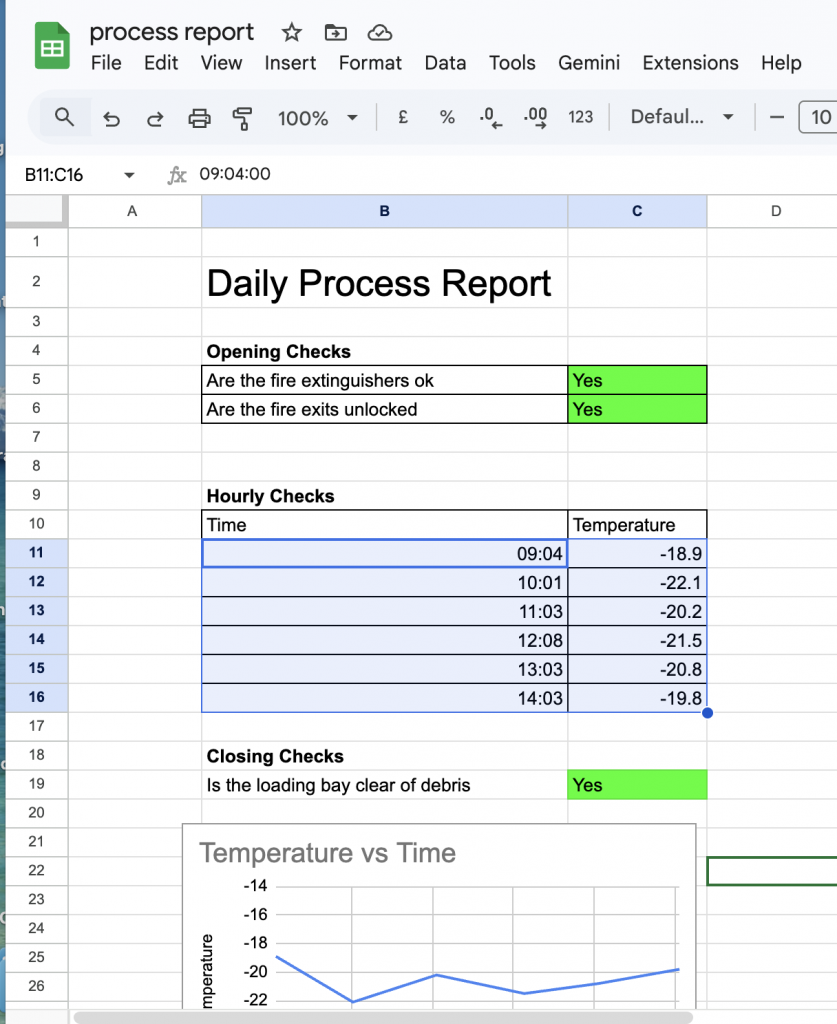
Above we can see what would be on the screen of a tablet after scanning the process QR code for an example ‘East warehouse’. We can see that the opening checks were carried out and we are now in the ‘hourly checks’ stage of the process. There is just one question to ask in the hourly checklist here, ‘what is the temperature’ and we can see from the note at the top of the screen that once answered the next check will be due in 59 minutes.
A the bottom of the screen we can see an action button – ‘close warehouse’. This will take out out of the ‘hourly checks’ stage of the process so no we won’t expect any more hourly checks to be completed, instead the closing checklist begins immediately.
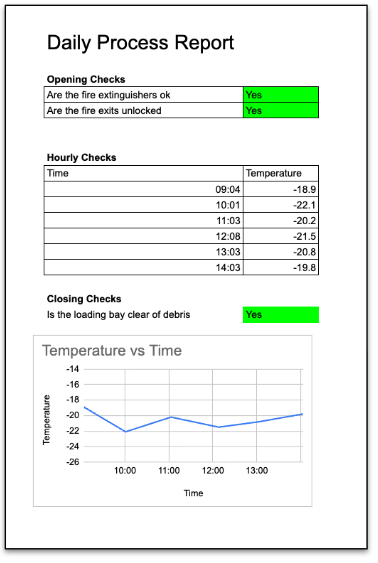
A daily report has been set up which includes answers from all of the checklists in the processes. The opening and closing checklists have a block to themselves at the top and bottom of the page respectively and the hourly checklists each have just one line in a table of hourly temperature checks. Because the report is produced from a template spreadsheet it is easy to include graphs, conditional formatting and so on. A graph of the recorded temperatures has been included in this case.
Other common uses:
Traceability: Traceability information can be gathered at the start of the process. Extra stages can be added in to the production line so when production line changes take place, e.g. when switching to another flavour or filling on a food production line, updated information can be added before production contines
Exception handling: Checklists to be carried out when something goes wrong and production needs to stop can be included – for example a glass breakage. Buttons for these actions are shown in the main production checklist screen so it is easy to switch away from the production stage, carry out the neccessary check, and continue.
Creating a process
Processes are managed in the ChecQR dashboard. The overall flow is as follows:
- Think about how you can divide your process into separate checklists.
- Create the checklists for your process
- Create your process and add the checklists to the different stages of the process
- Set up reports if required
Dividing your process into checklists
ChecQR offers a lot of flexibility when adding checklists to processes, for example you can reuse a checklist in multiple process stages and you can have use multiple checklists in a process stage. This means there are no particular restrictions on what you can do, but we recommend the following to keep things simple:
- Try to create each checklist to cover a single theme or issue
- It’s simpler not to leave checklists open/running for extended periods, it’s better if questions can all be answered at once
- If there are multiple people involved in your process try to make each checklist answerable by someone doing just one role
Creating the Checklists
Checklists for processes are no different to other checklists created in ChecQR, and are created in the normal checklist section.
Creating a process flow
To find the processes section click the ChecQR logo to go to the home page for your organisation and then click ‘manage processes’ at the bottom right hand side of the screen. Then click ‘build new process’ to begin.
Processes in ChecQR consist of a number of stages. There are 2 kind of stages:
- Ongoing stages – these are stages that keep running until a user presses a button to leave the stage, during this time checklists can become due every half hour, 1 hour or 2 hours. e.g. production line running
- ‘move when complete’ stages, these are stages where completing all of the associated the checklists will result in moving to the next stage e.g. opening checks
To build your process click ‘add stage’. Then for each stage:
- Add at least one checklist for that stage
- Choose between ‘move to next stage when questions complete’ and ‘remain in this stage (ongoing)’
For ongoing stages remember to also
- Choose how often checks must be carried out
- Click ‘add step’ to add at least one way out of the stage, otherwise the process will be stuck in it forever! For a simple process this often looks like the example below.
- The ‘event name’ sounds technical but it is simply the text which will appear on the button at the bottom of the process screen

Extra stages can be added along with extra events to give routes between them or back to them.
Setting up reporting
Process reporting is based on Custom results forms in ChecQR. A process report is made by compositing a custom report for each checklist onto a single page. Its a bit like ChecQR copy-and-pasting the custom report for each checklist in the process onto a single page
To create a custom report follow these steps:
- Set up your process and checklists
- Create a custom report for each checklist as a small block as you wish it to appear on your final custom report
- Tell ChecQR where to place each report on the custom report page
More information about creating a custom report for each checklist is available here: Custom results forms
One this has been done you can go to the report settings for your process and set u the overall report.
East Warehouse Example
The East Warehouse process example uses 3 checklists. The custom reports for each checklist look as follows:
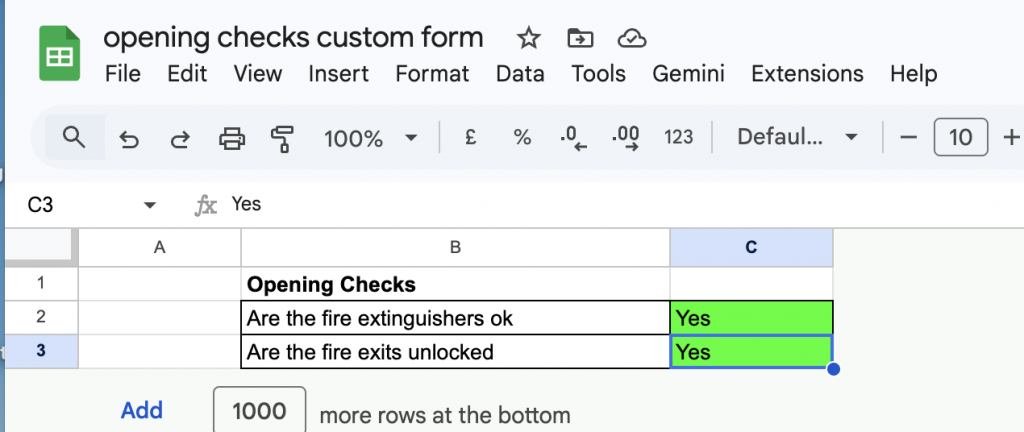
Note that unused rows and columns beyond have been deleted completely and that the column widths and heights match between the various sheets.
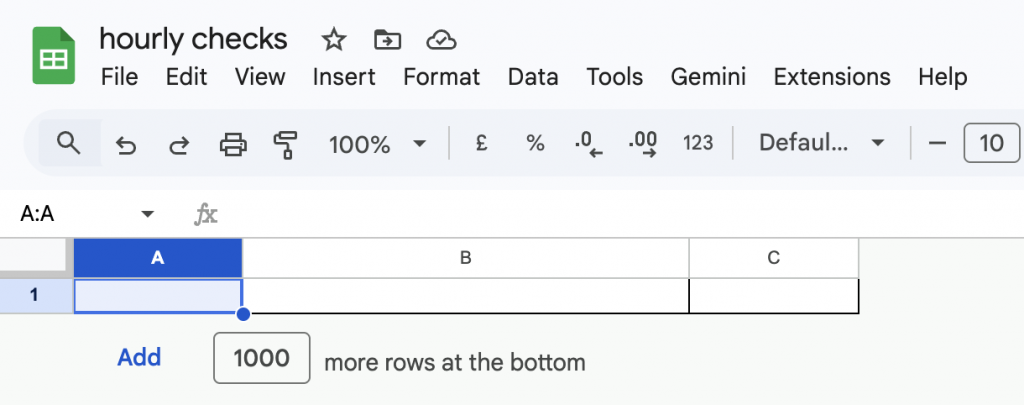
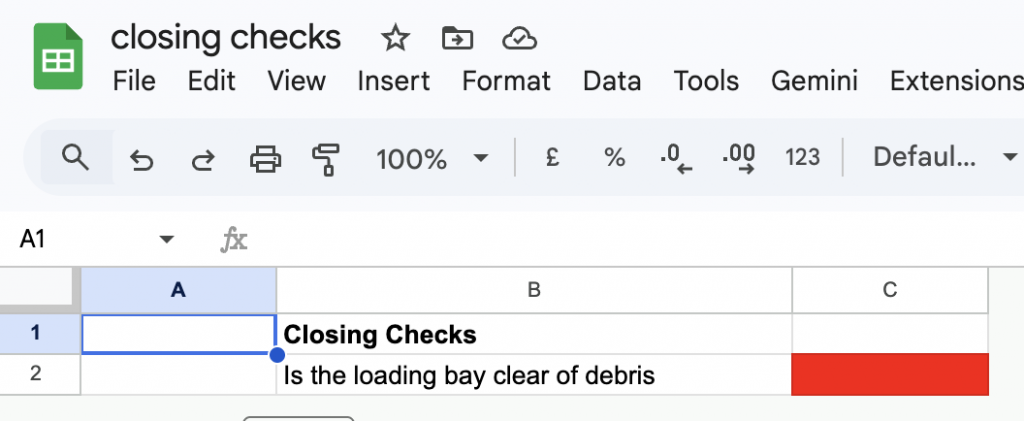
The hourly checks is particularly minimal and it does not include headers as it will be repeated many times and the headers do not need to be repeated on the main report
The closing checks has conditional formatting enabled and no value in the cell so it is showing as red, but will change to green when data is added. Data values in ‘answer’ cells will be overwritten when the report is made so it is safe to leave placeholders in, although it may be wise to make it obvious they are placeholders so you can be confident real data has been inserted correctly into the form when you are testing.
Once these elements are all producing satisfactory PDFs for each checklist you are ready to combine them into your main report.
The main report is a composition of the custom reports for each checklist and any additional formatting or elements you wish to add. It is again an xlsx spreadsheet. Strictly you do not need to add values or formatting in in the areas where the results from your checklists will be as that will be copied in, but it is easier to keep track of how your report will look if you do
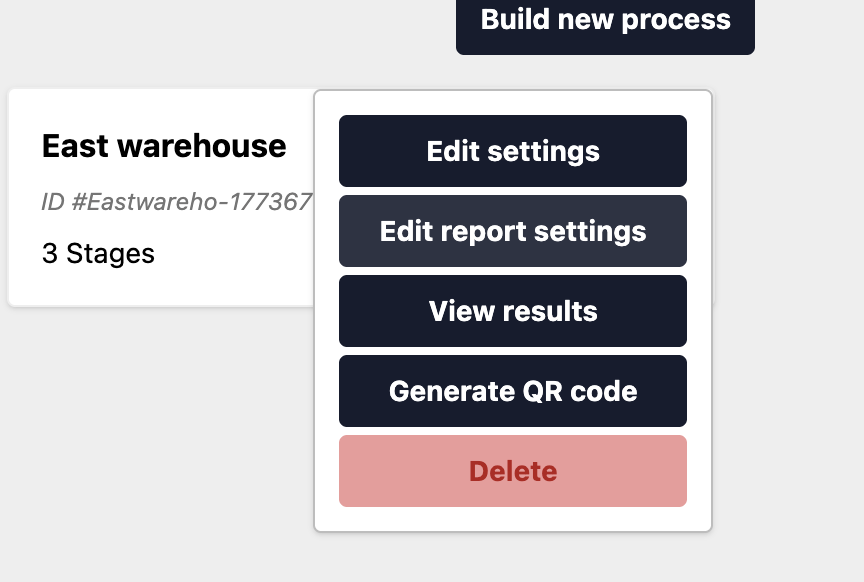
The ‘Edit report settings’ option is in the menu for your process on the processes homepage. From here you can upload your template report and specify where each of the process reports should be placed into your template by giving a cell reference for the top left corner